With Raspberry Pi 4 and 5 pricing still being a bit high lately, I wanted to see if the more affordable Raspberry Pi Zero 2 could still be a practical option for real-world projects—which, ironically, is now priced around what the Pi 5 used to cost. In this guide, we’re going to get the Zero 2 up and running, walk through a quick introduction, and then connect a motion sensor, LED, breadboard, and camera module to build a few simple automation projects using Python.
And if you’re new here and enjoy Raspberry Pi and homelab tutorials like this, consider subscribing to Mackey Tech so you don’t miss future content.
Raspberry Pi Zero 2 Overview
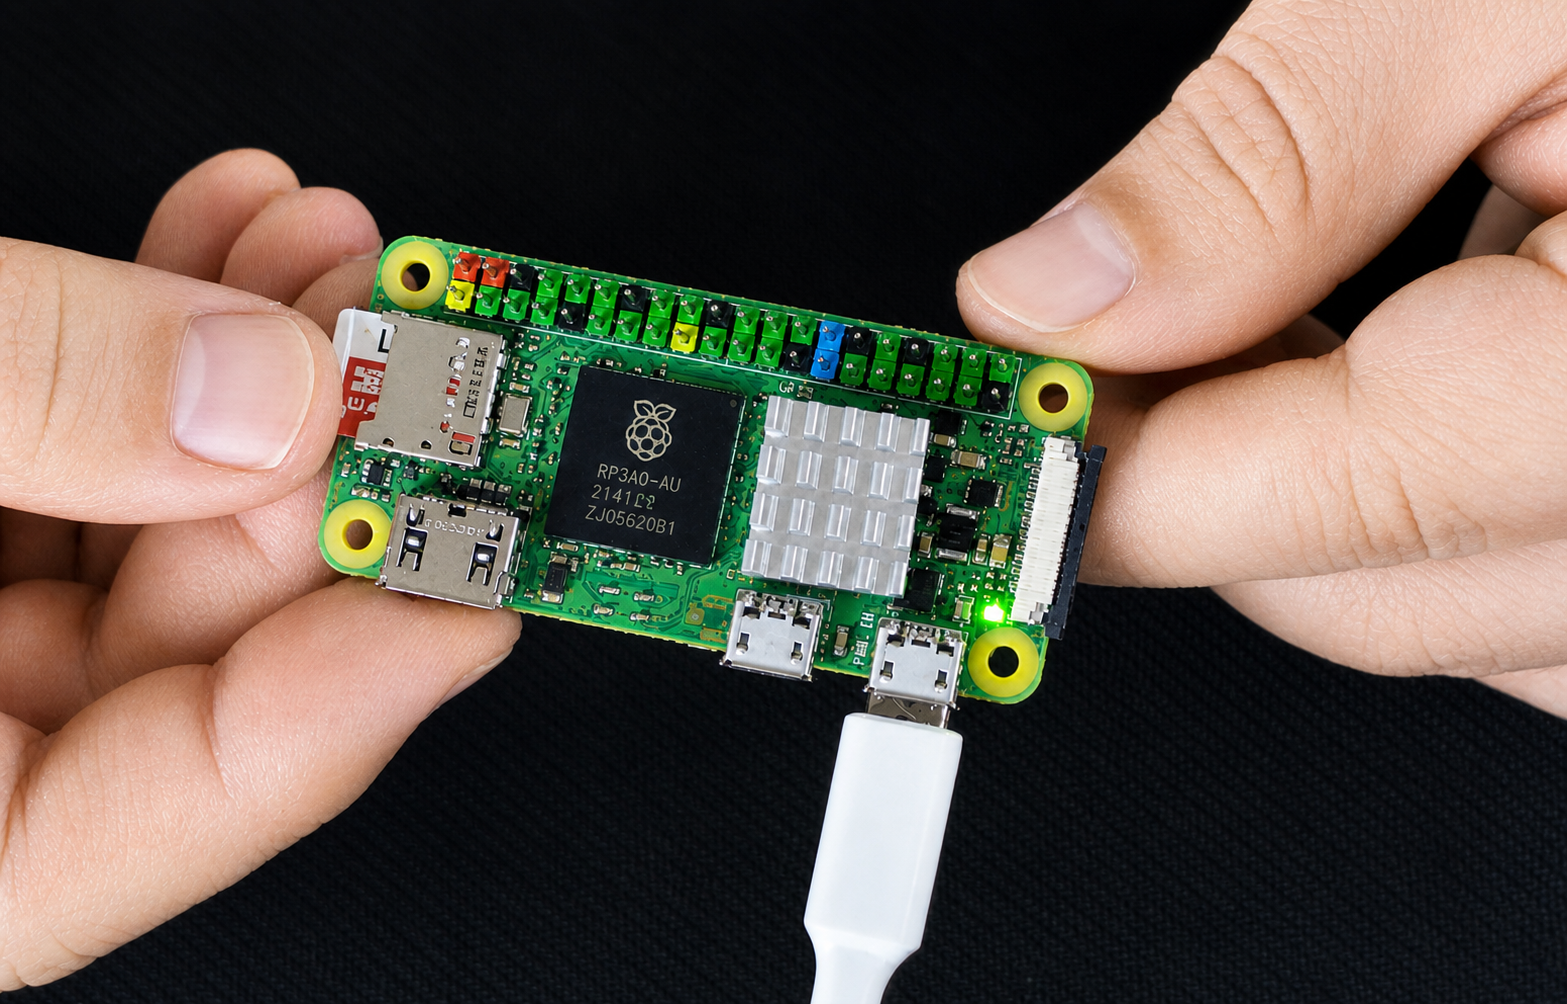
The Raspberry Pi Zero 2 comes with a modest 512MB of RAM, but it’s powered by a quad-core 64-bit ARM Cortex-A53 running at 1GHz—the same CPU found in the Raspberry Pi 3. The WH variant includes built-in Wi-Fi and Bluetooth, along with a pre-soldered 40-pin GPIO header that uses the same layout as the Raspberry Pi 3 through Pi 5, making it fully compatible with most GPIO-based projects.
The board includes two Micro-USB ports—one for power and one for data. For peripherals like a keyboard or mouse, you’ll need a Micro USB OTG adapter, while the power port should be connected to a reliable 5V 2.5A power supply. If you already have a Raspberry Pi 4 or 5 adapter and a USB-C to Micro-USB cable, that will work just fine. For display output, the Pi Zero 2 uses Mini-HDMI, so you’ll need a Mini-HDMI to HDMI cable.
Flashing Raspberry Pi OS
To get started, we’ll flash a MicroSD card using the Raspberry Pi Imager. Select the Raspberry Pi Zero 2 as the device and choose the 32-bit version of Raspberry Pi OS. The 32-bit version is recommended here since it uses less RAM and runs more efficiently on the Zero 2’s limited memory.
While flashing the OS, it’s a good idea to enable SSH, assign a hostname like ‘pizero2‘, configure your Wi-Fi, and create your user account so the system is ready to go immediately after boot.
Once booted, take a moment to explore the desktop, open a terminal to verify your hostname and IP address, and optionally run tools like htop to monitor system resource usage. You can also open Thonny to see how lightweight Python development is on this system.
Installing Dependencies
Before jumping into the projects, we need to install a few required packages. Start by updating your system:
'sudo apt update && sudo apt upgrade -y'Next, install the Python libraries and camera support:
'sudo apt install python3-gpiozero python3-picamera2 -y'And finally, install FFmpeg for handling video processing:
'sudo apt install ffmpeg -y'These dependencies will allow us to control GPIO pins, interface with the camera, and handle video recording.
Project Setup: Motion Sensor and LED
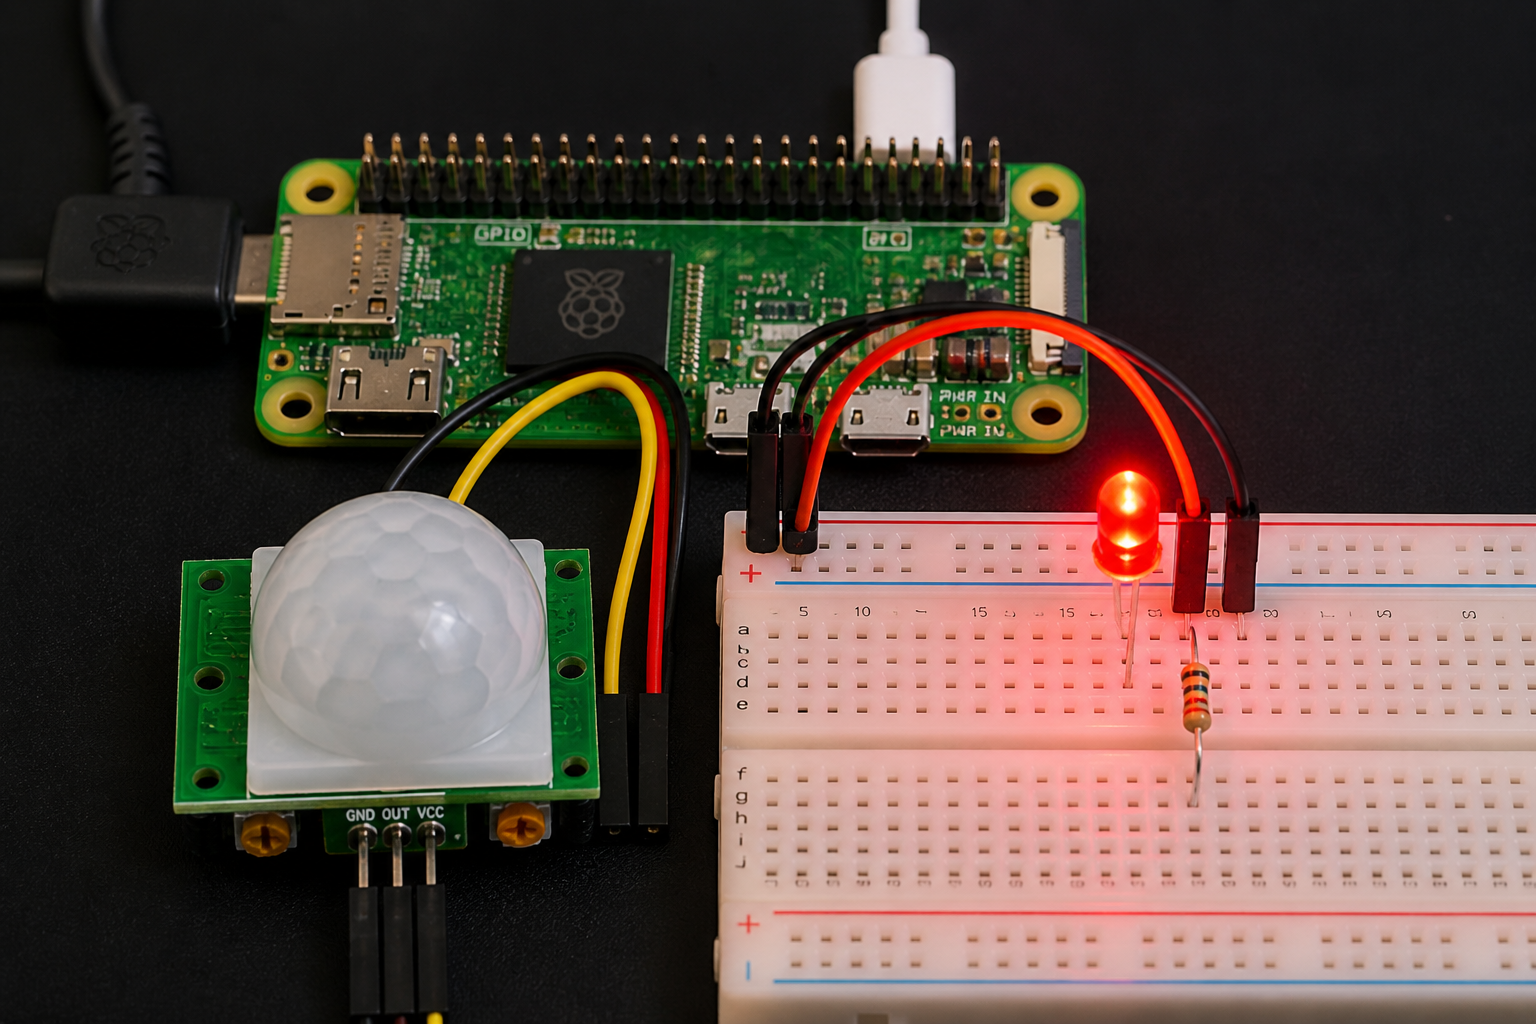
For the first project, we’ll connect a PIR motion sensor and an LED using a breadboard. Since the Pi Zero 2 WH already has GPIO headers, we can use jumper wires to connect everything directly.
The motion sensor we’re using is the HC-SR501 PIR sensor. PIR stands for Passive Infrared, meaning it detects motion by sensing changes in heat—like when you move your hand in front of it. The sensor has three pins: VCC (power), GND (ground), and OUT (signal). The OUT pin connects to a GPIO input on the Pi, such as GPIO 17, while VCC connects to 5V and GND connects to any ground pin.
On the breadboard, the LED is connected with a resistor for protection. The longer leg (anode) connects to GPIO 27, while the shorter leg (cathode) connects to ground. When motion is detected, the LED will turn on, and after a short delay, it will turn back off.
Using Thonny for Python Development
For all of these projects, we’re using Thonny, which comes pre-installed with Raspberry Pi OS. Thonny is a simple and beginner-friendly Python IDE that makes it easy to write, test, and run scripts directly on the Pi.
You can open Thonny from the desktop or by running Thonny.
We’re organizing our scripts into their own directory, and it’s important to make sure the folder has the correct permissions before running them. This helps avoid issues when accessing files or saving images and videos.
For the full scripts used in this guide—including LED control, motion detection, and camera automation—be sure to check out my Patreon, where I’ve provided complete working examples.
Adding a Camera for Motion Detection
In the second project, we expand on the setup by adding a camera module that captures an image whenever motion is detected. We’re using an Arducam V2 8MP camera, which includes a ribbon cable specifically designed for the Pi Zero 2.
To install it, power off the Pi, gently lift the CSI connector latch, insert the ribbon cable with the contacts facing the board, and secure it by pressing the latch back down. Once powered back on, the camera is ready to use with the Picamera2 library.
If you encounter a “GPIO busy” error while running scripts, it usually means another process is already using the pins. You can stop it with:
'sudo systemctl stop pir.service'
Mounting a NAS for Video Storage
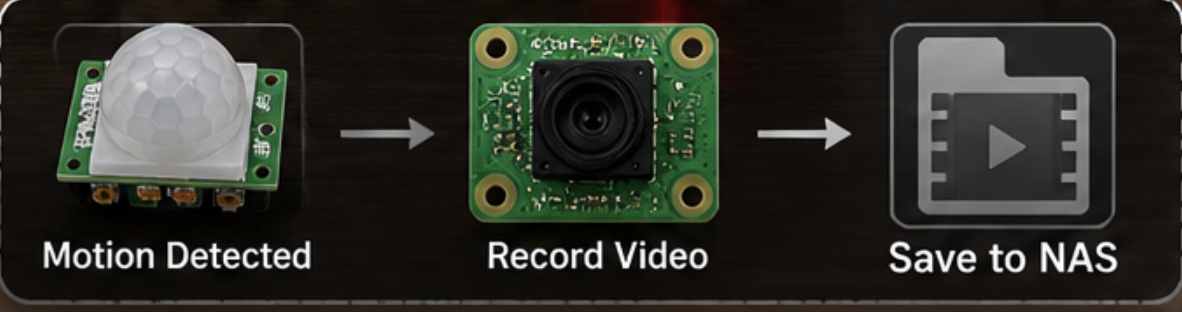
For the final project, we take things a step further by recording video when motion is detected and saving it to a NAS. This is a great way to avoid filling up the Pi’s SD card.
First, create a directory for the mount point if needed, then mount your NAS share using:
'sudo mount -t cifs //NAS-IP/Pizero2 /home/username/shared -o username=NASUSERNAME,password="NASPASSWORD",uid=$(id -u),gid=$(id -g),file_mode=0666,dir_mode=0777'
If your password contains special characters, make sure to wrap it in quotes. This command mounts the share temporarily for the session, which is perfect for testing.
Once mounted, your Python script can save video files directly to the NAS location.
Bringing It All Together
By starting with a simple motion sensor and LED, then adding a camera and network storage, we’ve built a basic but functional surveillance system using the Raspberry Pi Zero 2. While it’s not meant to replace a dedicated solution like MotionEye, it’s a great demonstration of how powerful this small board can be when combined with Python and a few components.
For a device with only 512MB of RAM, the Pi Zero 2 handles these projects surprisingly well and proves to be a capable option for lightweight automation tasks!
Final Thoughts
This project is a great introduction to working with GPIO, sensors, cameras, and network storage on the Raspberry Pi. If you want the full scripts and a deeper walkthrough of each project, make sure to check out my Patreon, where everything is available in the fre membership tier.
Thanks for reading, and stay tuned for more Raspberry Pi and homelab content here on Mackey Tech!