My first homelab video goes all the way back to 2024, and since then, quite a bit has evolved. I’ve added a second Proxmox node, upgraded my network to 10 gig, and brought in a new NAS that’s become central to my workflow. Everything in this setup was purchased with my own money, with the exception of the ZimaBoard 2, which was sent over for review. If you’re into homelab tech, self-hosting, and NAS content, this is exactly the kind of setup I’ll continue building on.
The Original Proxmox Server: From Workhorse to Test Bench
At the core of my homelab is still my original Proxmox server, a Supermicro build I put together in 2022. It’s powered by a first-generation EPYC 3251 SoC with 8 cores and 16 threads, paired with 64GB of ECC RAM. It also includes four Ethernet ports and a dedicated IPMI interface, which has been invaluable for remote troubleshooting and management.
Originally, this system handled all of my virtual machines and containers, but as the lab has grown, its role has shifted. These days, it serves more as a testing environment where I can spin up new VMs and LXCs, experiment with configurations, and build out tutorials without affecting anything critical.
Over the past year, I’ve added a Home Assistant VM along with a USB Zigbee coordinator passed through to it. That setup lets me control seven studio lights, all connected via smart plugs, from a single remote instead of manually toggling each one. I also deployed CasaOS in an LXC and added Uptime Kuma to monitor both experimental and always-on services. More recently, I used another LXC to build out my WordPress site before pushing it live. Going forward, I plan to migrate key always-on services like Home Assistant and monitoring over to my newer node.
Storage and Networking: Synology to UGREEN and the Move to 10GbE
My Synology DS920+ was my primary NAS for years, but it has since been repositioned as a backup target. It now primarily backs up my newer UGREEN NAS, which has taken over as the main storage platform in my setup.
Switching from Synology to UGREEN wasn’t a decision I made lightly. I’ve relied on Synology for a long time, but ultimately, UGREEN offered significantly better hardware specs at a more competitive price point. I have an entire video detailing my decision making process! I went with the DXP 6800 Pro, loaded it with four 8TB drives in a RAID 5 configuration, and added a 1TB NVMe drive for caching.
With 8GB of RAM and dual 10 gig Ethernet ports, this unit has been a major upgrade. It currently handles media streaming through Jellyfin and runs Joplin in Docker, which I moved to as a self-hosted alternative to subscription-based note-taking platforms like Evernote. It’s also become my central archive for YouTube footage, and more recently, I’ve started editing videos directly off the NAS thanks to the increased network speed. In addition, it serves as a backup target for my Proxmox snapshots.
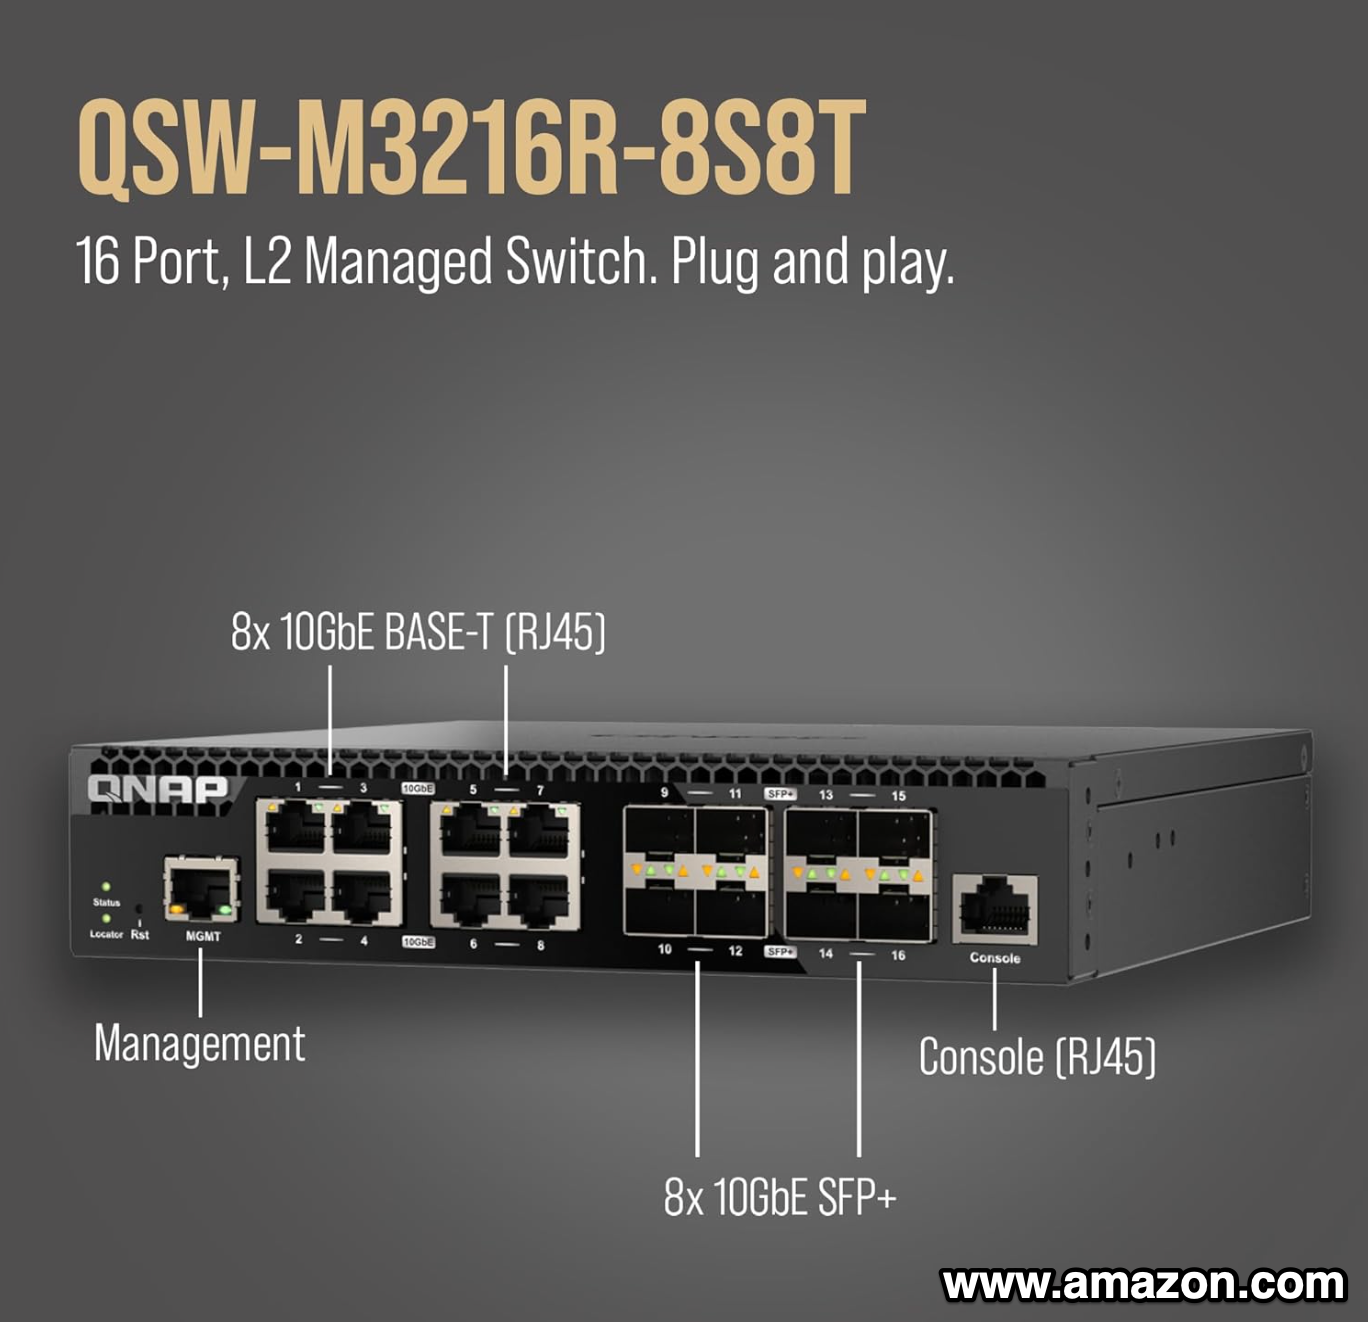
That shift toward editing over the network is what drove my move to 10Gb. I picked up a 10 gig managed switch from QNAP with at least eight 10Gb ports. While I would’ve preferred to stay within the UniFi ecosystem, most of their offerings included PoE, which I didn’t need, and the RGB port design didn’t really appeal to me. The QNAP switch also supports multi-gig speeds—2.5, 5, and 10Gb—which adds a lot of flexibility.
The rest of my network is built around a UniFi UDM Pro and a 16-port PoE switch powering five G4 cameras and two access points, including a WiFi 7 unit I added last year.
The ZimaBoard 2: Expanding Into a Proxmox Cluster
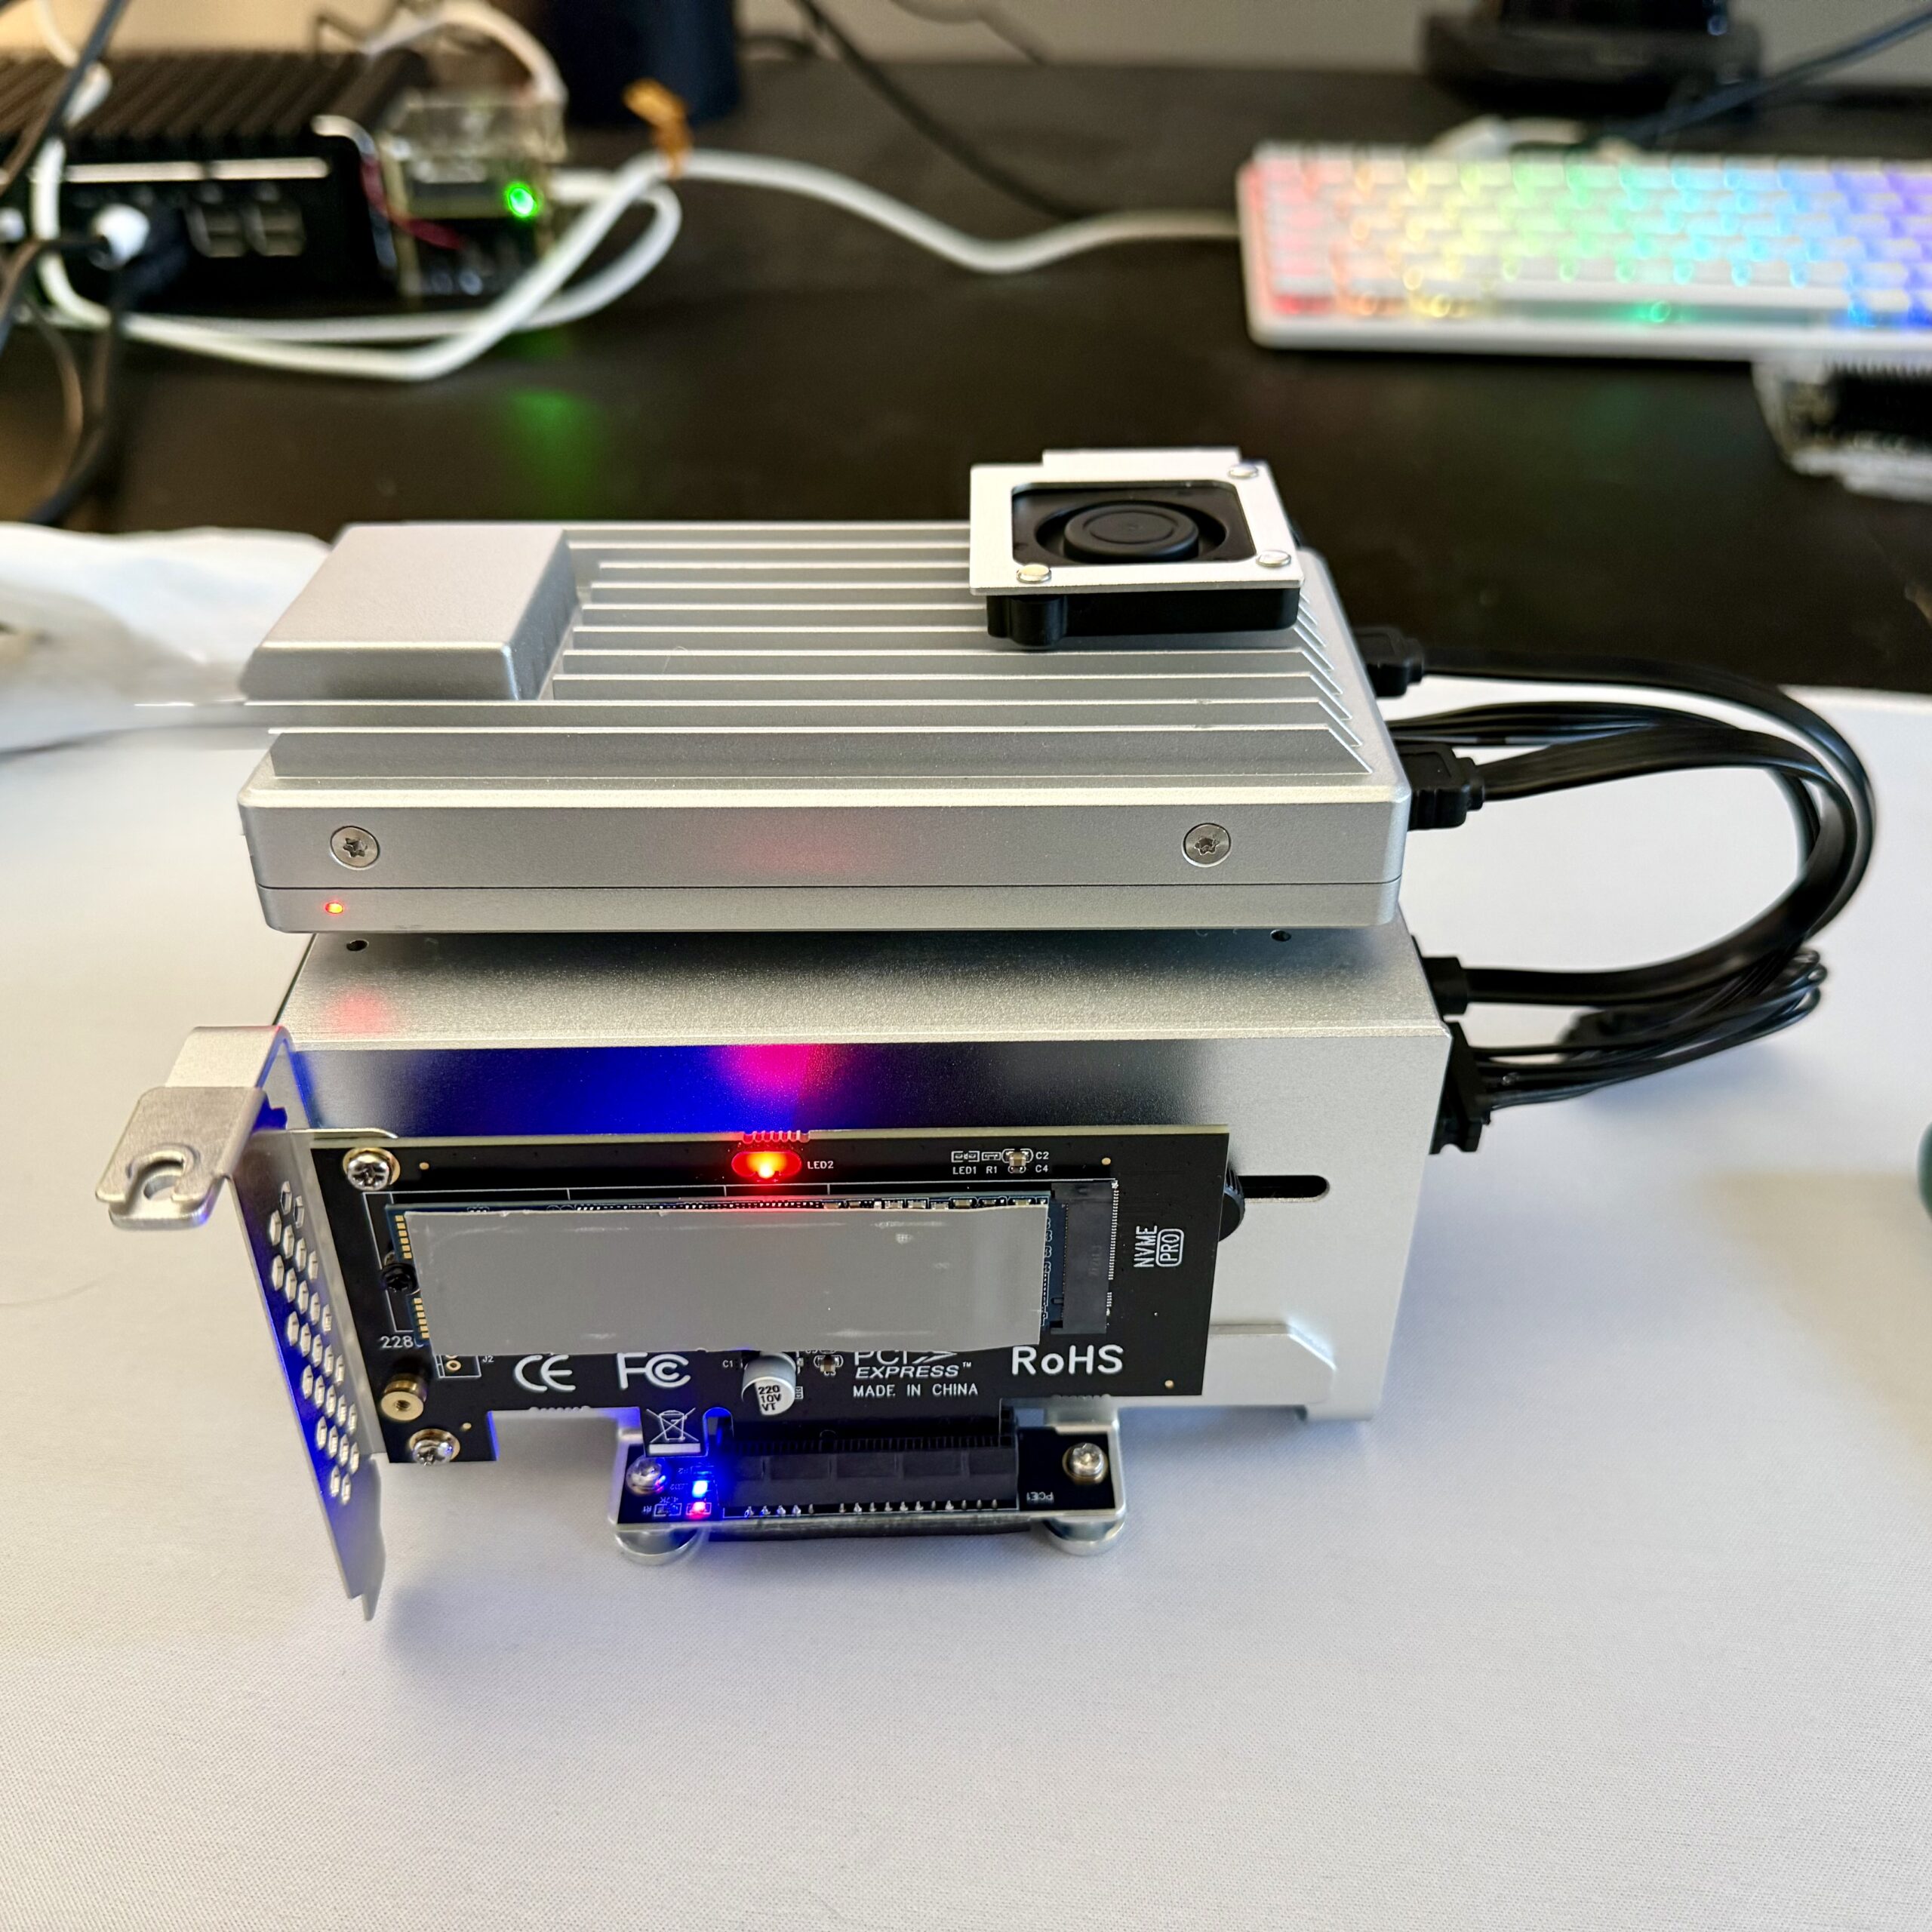
The newest addition to the lab is the ZimaBoard 2, which I’m using as a second Proxmox node. With that in place, I now have a small cluster, which means I can manage both systems from a single interface and start thinking more in terms of workload distribution rather than just capacity.
The ZimaBoard comes with 16GB of RAM and 64GB of onboard eMMC, but instead of relying on the internal storage, I’m running Proxmox from a 256GB NVMe drive connected via PCIe. I’ve also attached two SATA SSDs for ISO storage and for running VMs and containers. Given the more limited RAM compared to my main node, I’ll likely favor LXCs here to keep things efficient.
One of the first services I deployed on the ZimaBoard is Paperless, a document management system that makes it easy to tag, search, and organize files without relying on traditional folder structures. It also has a mobile app, which makes scanning and uploading documents straightforward.
I’m also running an Ubuntu VM with a LAMP stack—Apache, MySQL, and phpMyAdmin—to track my eBay sales. It currently uses about 4GB of RAM, but I’m considering moving it into an LXC to reduce overhead. Containers are more lightweight and don’t necessarily consume all allocated memory, allowing unused resources to be shared back with the host.
To compensate for the lack of built-in IPMI on the ZimaBoard, I added a JetKVM. It’s essentially an IP KVM with a web interface, giving me low-level access to the system even if the OS becomes unresponsive, which is a huge convenience for remote troubleshooting.
Repurposed Hardware and Daily Drivers
I also picked up a small firewall mini PC that I originally intended to run OPNsense on. After running into compatibility issues with UniFi Protect, I ended up repurposing it as an unmanaged switch in my office. It now doubles as a Fedora machine that I use fairly regularly, which ended up being a much more practical use for it in my setup.
Looking Ahead: Automating the Workflow
Looking forward, one of the next things I want to add is n8n to my Proxmox stack. The goal is to automate parts of my content workflow—things like publishing to social media and updating my website—so I’m not handling everything manually. It’s a natural next step as the lab becomes more integrated into my day-to-day work.
Final Thoughts
That’s where the homelab stands in 2026. It’s not over-the-top, but it’s a solid, practical setup that supports both my content creation and my interest in self-hosting. If you’re just getting started with homelabs, I’ve also put together a guide covering what to think about when building your first setup.
If you found this helpful, consider subscribing and following along. And if you’re running your own homelab, I’d love to hear what you’re using and what you’re building.