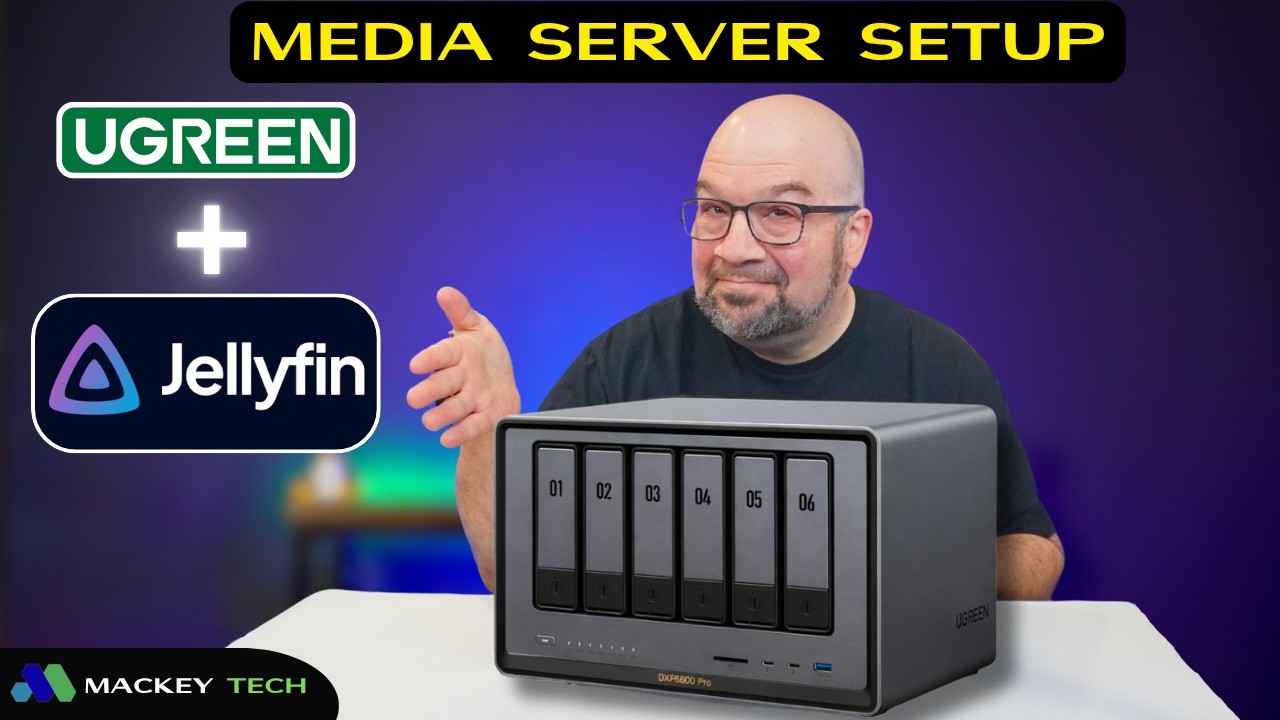
Jellyfin is a free, open-source media server that lets you organize and stream your own movies, television
shows, music, and home videos. Unlike some competing platforms, Jellyfin does not require a paid
subscription to unlock hardware-accelerated transcoding.
In this guide, we will install Jellyfin through the Project section of UGREEN’s Docker app. The overall
process is similar on other UGREEN NAS models that support Docker, although hardware-acceleration
options can vary by processor.
Two Ways to Install Jellyfin on UGREEN
UGREEN offers two practical installation routes:
• App Center: The fastest and simplest option. UGREEN handles most of the container setup for you.
• Docker Project: A more flexible deployment that lets you edit the Compose YAML, choose ports and
storage paths, pass hardware devices into the container, and redeploy after making changes.
The App Center version may be sufficient for many users. However, this guide uses a Docker Project because it
provides more control and makes future changes easier.
Before You Begin
Before installing Jellyfin, make sure the NAS has been initialized and its storage is ready. You will need:
• A compatible UGREEN NAS running UGOS Pro
• At least one configured storage pool and volume
• The UGREEN Docker app, installed from the App Center
• Administrator access to the NAS
• Folders containing your movies, television shows, or other media
It is a good idea to decide where your media will live before creating the project. You can change the paths
later, but planning your folder structure first makes the setup cleaner.
Create the Jellyfin Docker Project
Open the Docker app in UGOS Pro, select Project, create a new project, and give it a recognizable name
such as jellyfin. Paste the following Compose configuration into the project editor, replacing the media pathswith the actual locations on your NAS.
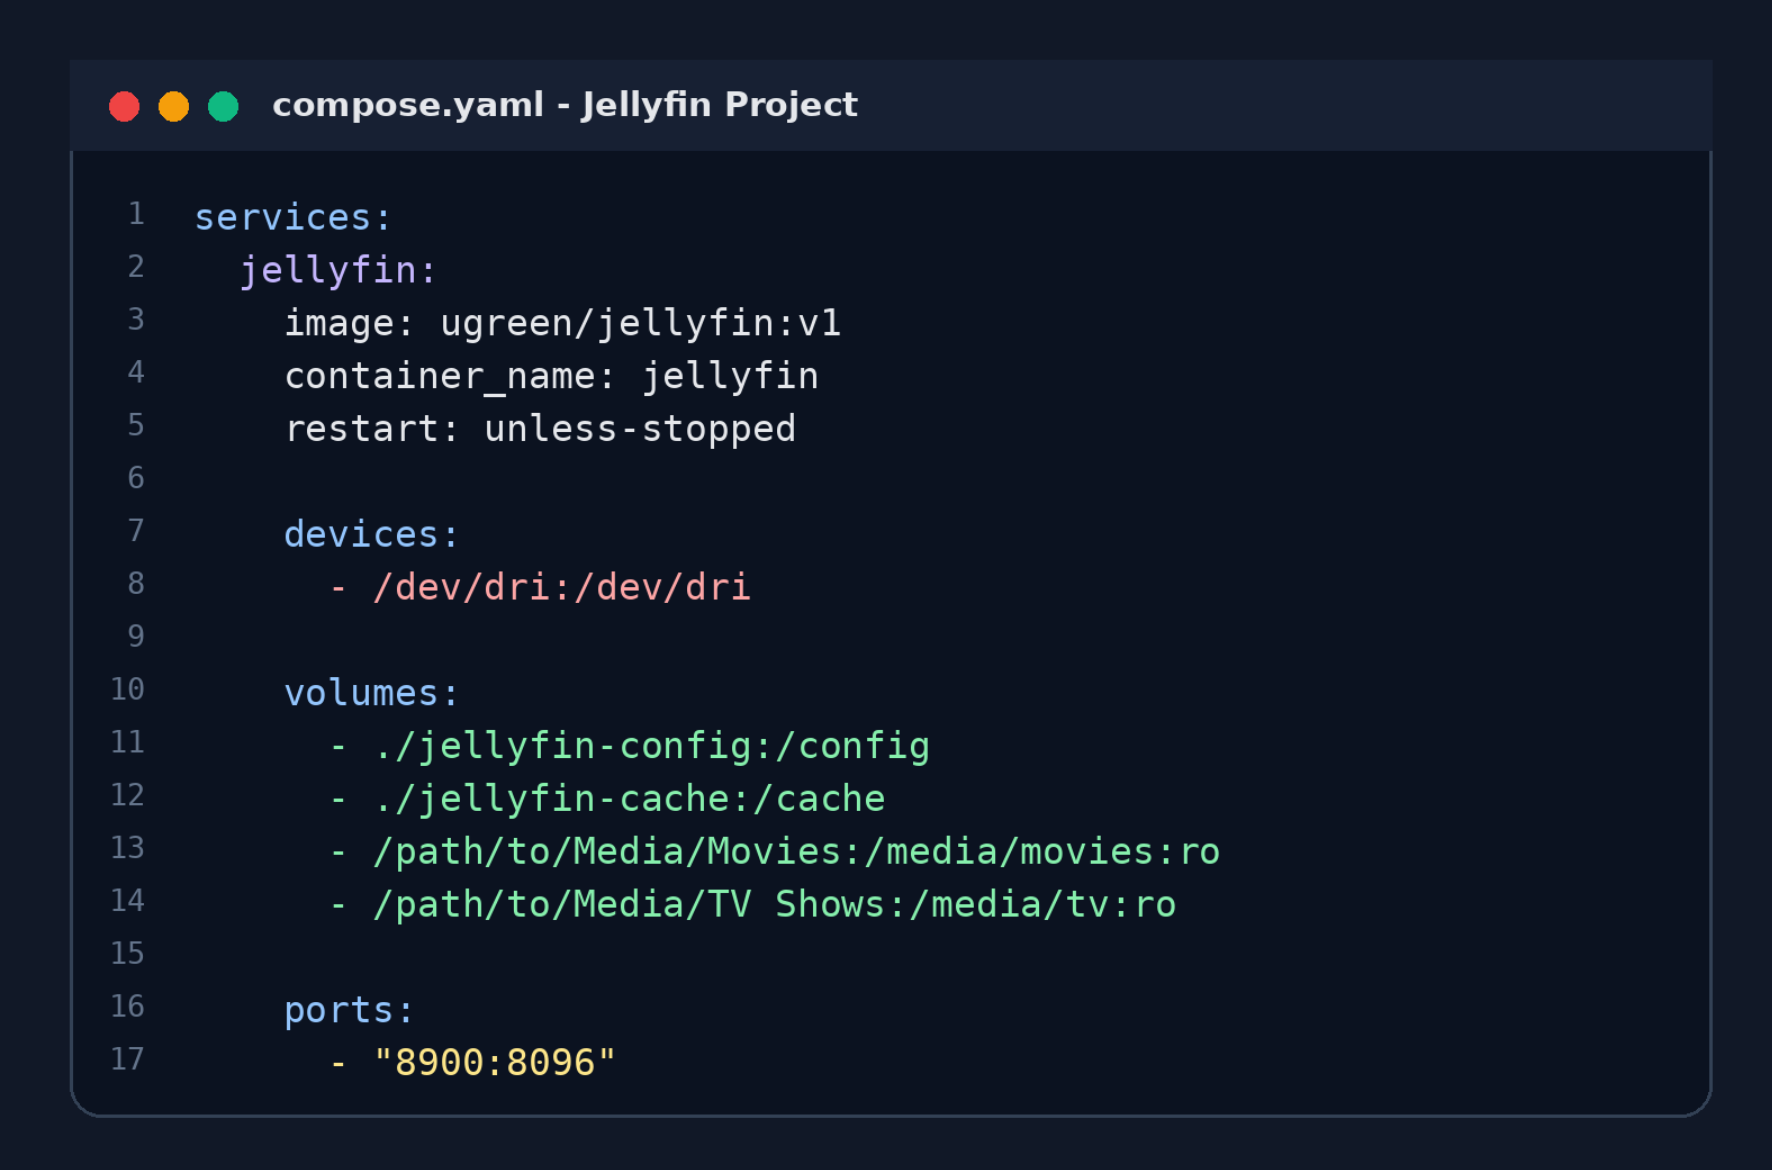
Example Docker Compose YAML for an Intel-based UGREEN NAS. Replace the placeholder media paths with the paths used by your
own storage pool and shared folders.
For a more detailed line-by-line explanation of the YAML file, see my free Patreon membership post: Mackey Tech – Jellyfin Docker YAML Breakdown
Understanding Volume Paths
Docker volume mappings use the following format:
NAS path : container path
The path on the left points to the real folder on the UGREEN NAS. The path on the right is where Jellyfin sees
that folder inside its container. When adding a library in Jellyfin, you select the container path, not the original
UGOS file-system path.
For example, if this mapping is used:
*/path/to/Media/Movies:/media/movies:ro
Jellyfin will browse the folder as /media/movies. The optional ‘:ro’ makes the mount read-only, allowing
Jellyfin to scan and play the files without modifying or deleting them.
Where Should You Store Your Media?
The relative paths used for Jellyfin’s configuration and cache keep those files inside the Docker Project
directory. This is convenient and makes the application easier to manage.
For a permanent media library, it is usually better to store movies and television shows in separate shared
folders outside Docker’s default project directory. This keeps your personal media separate from the
application files and makes it easier to:
• Access the media through SMB or the UGREEN File Manager
• Back up the media separately from the Jellyfin application
• Rebuild or replace the Jellyfin container without moving the library
• Allow other applications to access the same media collection
A sensible arrangement is to keep /config and /cache with the Docker Project while mapping your existing
Movies and TV Shows shared folders into the container.
Deploy the Project and Open Jellyfin
YAML is indentation-sensitive, so use spaces rather than tabs and verify that each section is aligned
correctly. Deploy the project and confirm that the Jellyfin container is running.
The example port mapping is:
* 8900:8096
The first number is the port used on the NAS. The second number is Jellyfin’s internal HTTP port. If the NAS
has the local IP address 192.168.1.100, open: http://192.168.1.100:8900
You may replace port 8900 with another unused NAS port. The internal port normally remains 8096.
Complete the Jellyfin Web Setup
The first time you open Jellyfin, the setup wizard will guide you through the basic configuration:
• Select your preferred language.
• Create the administrator account and choose a strong password.
• Create separate libraries for Movies, Shows, Music, Home Videos, and other content types.
• Select the container-side folder paths, such as /media/movies and /media/tv.
• Choose the preferred metadata language and country.
• Decide whether Jellyfin should allow remote connections.Allowing remote connections in Jellyfin does not automatically make the server securely accessible from the internet. Avoid directly forwarding the Jellyfin port unless you understand the security implications. A private-access service such as Tailscale is often a simpler option.
Organizing Movie Libraries
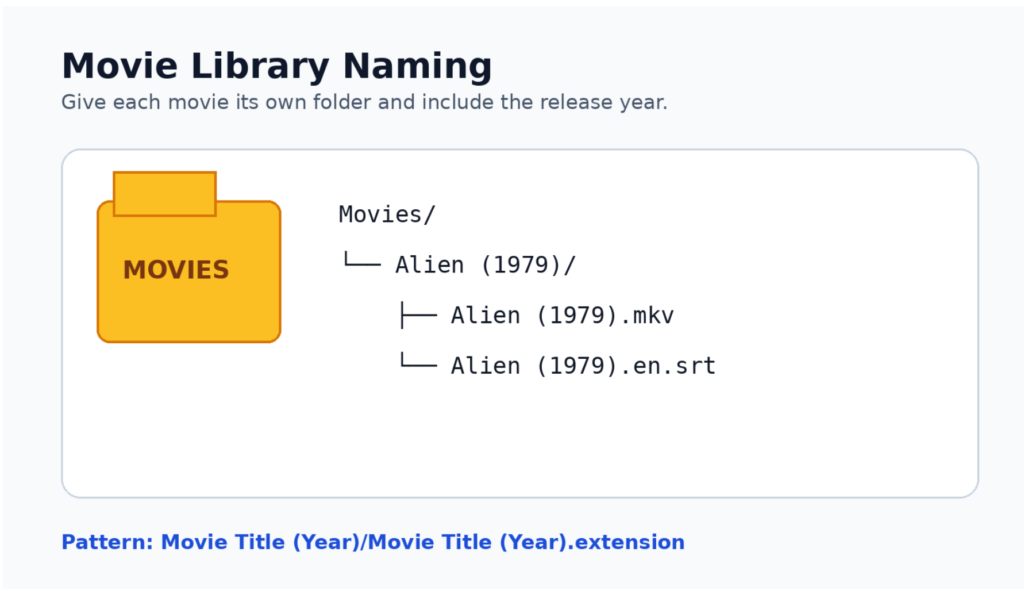
The release year helps Jellyfin distinguish remakes and similarly named movies. Giving each movie its own
folder also makes posters, subtitles, extras, and alternate versions easier to manage.
Organizing TV Show Libraries
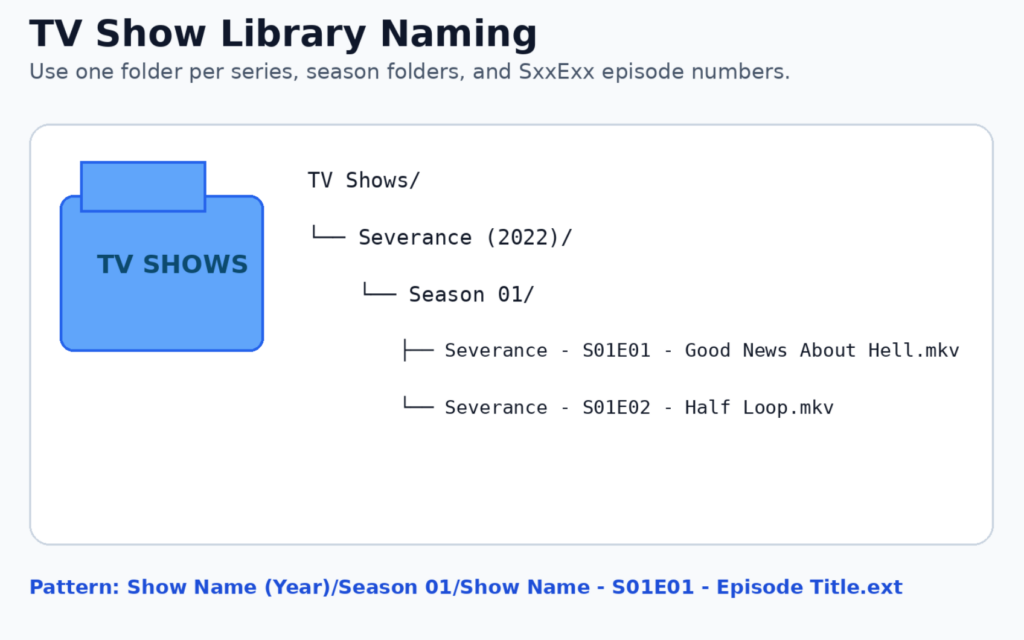
The most important part of an episode filename is the season-and-episode identifier, such as S01E01.
Specials are commonly placed in a Season 00 folder, and a file containing multiple episodes can use a
format such as S01E01-E02.
Direct Play and Transcoding
Direct Play sends the original file to the playback device without converting it. This uses relatively little
processing power. Transcoding occurs when Jellyfin must convert the video, audio, container, resolution,
bitrate, or subtitles for the client device.
Transcoding may be required when a client does not support the original codec, the available bandwidth is
limited, a lower streaming quality is selected, subtitles must be burned into the video, or HDR tone mapping is
required.
Intel Quick Sync on the DXP6800 Pro
This demonstration uses the UGREEN NASync DXP6800 Pro, which has an Intel Core i5-1235U processor
with integrated Intel graphics. Intel Quick Sync Video can accelerate supported video decoding and encoding,
reducing the load on the CPU during transcoding.
The /dev/dri:/dev/dri device mapping gives the Jellyfin container access to the compatible graphics
device. After the initial setup, open: Dashboard > Playback > Transcoding
For this Intel system, Intel Quick Sync or VA-API will usually be the relevant hardware-acceleration options.
Do not enable every codec simply because it appears in the menu; supported formats depend on the
processor generation and driver configuration.
AMD Ryzen and ARM-Based UGREEN Models
Other UGREEN models use AMD Ryzen or ARM-based processors. Jellyfin can support hardware
acceleration on compatible AMD and Rockchip hardware, but the exact method and container configuration
may differ from the Intel example in this guide.
Actual hardware-transcoding support depends on the specific processor, its integrated media engine, the
available Linux drivers, whether UGOS exposes the graphics device to Docker, and whether the Jellyfin
image includes the required support. These systems can still use Direct Play even when hardware
transcoding is unavailable.
Library and Naming Media
• Keep movies, television shows, music, and home videos in separate libraries.
• Include release years in movie and series folder names.
• Use consistent SxxExx episode numbering.
• Organize the files before the initial library scan whenever possible.
• Correct any mismatched metadata from Jellyfin’s identification tools.
• Back up the Jellyfin configuratioUn folder as well as your media.
Backing up only the media will not preserve user accounts, watch history, library settings, custom metadata,
or server preferences. Include the NAS folder mapped to /config in your regular backup strategy.
Updating Jellyfin
A Docker Project makes future changes straightforward. Edit the YAML and redeploy whenever you need to
modify a path, port, device mapping, or another setting. Before major updates, back up the configuration
folder, verify the volume paths, and review the release notes.
The container itself should be treated as replaceable. The persistent configuration and media must remain
outside the container so they survive an update or redeployment.
Final Thoughts
Installing Jellyfin from UGREEN’s App Center is the fastest route, but deploying it through the Docker app’s
Project section provides greater control over storage, ports, hardware access, and future changes.
The key concept is understanding the difference between the real path on the NAS and the path Jellyfin sees
inside its container. Once the paths are mapped correctly and the media is organized using consistent
naming conventions, Jellyfin can build a polished and easy-to-browse personal streaming library.
My UGREEN NAS Overviews
Why I walked Away from Synology after 15 years!
I Swapped UGOS For TrueNAS On the UGREEN DXP 4800 Pro, Here’s What Happened!
💻 Hardware Used:
✅ Some links may be affiliate links, which help support me and help keep ads off here!
- UGREEN DXP6800 Pro: https://amzn.to/4tKmKoF
- 4x 8TB Ironwolf HDD Used in 6800 Pro: https://amzn.to/4diniNt
- 256 Kingspec NVMe Drive: https://amzn.to/4ukfJvG